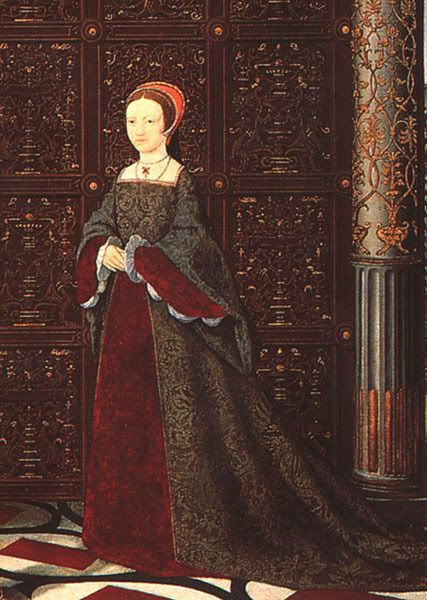
I have begun the next phase! Here is a portrait of Jane Seymour (1537) that shows the forepart and sleeves decorated with black outline embroidery and silver oes (sequins). This is going to be an amazing project! :D
I plan to recreate these elements as closely as I possibly can. I have a curtain I picked up at a goodwill a couple years ago that looks very similar to the pattern on J.S.'s forepart and sleeves. And while it's not a voided velvet, it does come close.
I have a couple spools of black silk thread I will use doubled up to embroider with and I purchased a bag of about 14,000 flat silver sequins. Since I cannot possibly afford to punch oes from a sheet of flattened silver, the plastic sequins will just have to do. :P
March 14, 2008
.jpg) It took me a couple days, but I finally got the pattern for the forepart to look half-way decent. I kept it pinned to the dressform for a couple days to make sure I liked the look of it. I made it nice and wide incase of flip-backs caused by the wind lifting my divided over-skirts. The overskirt won't show a whole lot of the forepart while at rest. So a lot of the embroidery won't be seen unless the wind takes my skirts! :( such a lot of work...
It took me a couple days, but I finally got the pattern for the forepart to look half-way decent. I kept it pinned to the dressform for a couple days to make sure I liked the look of it. I made it nice and wide incase of flip-backs caused by the wind lifting my divided over-skirts. The overskirt won't show a whole lot of the forepart while at rest. So a lot of the embroidery won't be seen unless the wind takes my skirts! :( such a lot of work...I drafted up the pattern for the sleeves, but forgot to take pictures. :( I used the patterns found in the Tudor Tailor and drafted both variations onto my butcher paper. Neither one gave me the right size and shape for the J.S. sleeve I'm going for so I drafted another pattern right in between the two from the book. My pattern works great! Now I get to finally use that beautiful curtain I rescued! (I only wish they'd had 2 of them!) :D
Time for this project: 3 hours
March 24, 2008
 Here I am cutting out the forepart. When I took the pattern off the dressform it was quite curved. It really didn't want to lay out flat, but I managed to press it out carefully with my hands so I could get the whole pattern on the fabric. I moved it around a couple times to place the pattern of the fabric where I wanted it. There is no discernable repeat so I didn't have to center it. Which is good because I still had sleeves to cut out!
.jpg) Here I am cutting out the sleeves. Instead of folding the fabric and cutting on the fold, I wanted total control of the pattern. So I pinned it in place and then placed pins along the pattern edge to mark it onto the fabric. After cutting that half I carefully unpinned and flipped the pattern over to finish the "fold cut". The second sleeve was much harder to cut out because I just had to fussy cut it. I couldn't just slap it on the fabric and cut away. I wanted the sleeves to have some sort of similarity when folded in front of me, so I had to make sure to reverse the pattern on the fabric to get the same look. This proved even more difficult because I couldn't match the layout exactly - the fabric pattern always ended up on the wrong side of the sleeve. So I had to compromise and pick a place in the fabric that would give the two sleeves a similar pattern even though they didn't exactly match. It'll do I guess.
Here I am cutting out the sleeves. Instead of folding the fabric and cutting on the fold, I wanted total control of the pattern. So I pinned it in place and then placed pins along the pattern edge to mark it onto the fabric. After cutting that half I carefully unpinned and flipped the pattern over to finish the "fold cut". The second sleeve was much harder to cut out because I just had to fussy cut it. I couldn't just slap it on the fabric and cut away. I wanted the sleeves to have some sort of similarity when folded in front of me, so I had to make sure to reverse the pattern on the fabric to get the same look. This proved even more difficult because I couldn't match the layout exactly - the fabric pattern always ended up on the wrong side of the sleeve. So I had to compromise and pick a place in the fabric that would give the two sleeves a similar pattern even though they didn't exactly match. It'll do I guess.I spent 1.75 hours on this which brings the total to 4hs 45min
March 26, 2008
.jpg) Here they are! The two sleeves are now nicely hemmed. I debated whether I should do that, but the fabric unravelled so easily I was afraid to touch it! So in the end I decided to hem the edges. I turned them under where I'd marked them with the pins so they are the same size as the pattern. Once I get them embroidered and all the oes stitched in place, then I will line them with something...probably linen. Depending on how stiff they become after all the stitching, I might need to add some canvas to give them a bit more body. This top fabric is exceptionally soft and flimsy.
Here they are! The two sleeves are now nicely hemmed. I debated whether I should do that, but the fabric unravelled so easily I was afraid to touch it! So in the end I decided to hem the edges. I turned them under where I'd marked them with the pins so they are the same size as the pattern. Once I get them embroidered and all the oes stitched in place, then I will line them with something...probably linen. Depending on how stiff they become after all the stitching, I might need to add some canvas to give them a bit more body. This top fabric is exceptionally soft and flimsy.I spent 1.5 hours hemming the sleeves.
Project total= 6hrs 15min
Sleeve #1 Completed April 3, 2008
.jpg) Here it is modeled with the cuff and pinned to the kirtle to see how it would hang. I've not added the oes yet and I'm not sure I will just yet. I'm still thinking about that decision.
Here it is modeled with the cuff and pinned to the kirtle to see how it would hang. I've not added the oes yet and I'm not sure I will just yet. I'm still thinking about that decision.Sleeve #1 took 16.5 hours to complete.
Sleeve #2 took 15hrs 15min to complete (completed 4/19/08)
Project total= 38 hrs.
FOREPART started 4/19/08
.jpg) This is the forepart as of 9/6/08 at 52 hrs 35 min of embroidery. It's taking longer for me to finish this than I thought as I get really tired of stitching the same design over and over. As I get toward the center of the panel it's getting harder to hold the fabric while I stitch. I tend to work on it a couple times a week for an hour or so at a time. I'm really fighting the boredom with this project. The sad part is, I still have another cuff to embroider yet! ugh.
This is the forepart as of 9/6/08 at 52 hrs 35 min of embroidery. It's taking longer for me to finish this than I thought as I get really tired of stitching the same design over and over. As I get toward the center of the panel it's getting harder to hold the fabric while I stitch. I tend to work on it a couple times a week for an hour or so at a time. I'm really fighting the boredom with this project. The sad part is, I still have another cuff to embroider yet! ugh.Total project hours= 90 hrs 35 min
February 8, 2009 FINISHED!
.JPG)
Another 72 hours of back-breaking, eye-straining, finger-pricking embroidery and it's all done! I was originally thinking I'd also add the silver oes as well, but now I'm thinking about being lazy :P Who knows, I may give in... on to the next project!
Total project time= 163hrs 35min
.jpg)
.jpg)
.jpg)